

How To List Comments In A Blog Chronological Order Django
Welcome to the fourth part of the Django blog tutorial series. In this part, we are going to allow users to create blog posts. We are also going to implement a comment system.
We will continue where we left off in the third part. If you want to follow along with me, download the source code of the project from this link: https://github.com/Rouizi/django-blog/tree/v0.3
Below, I included a list of the articles in this series:
- Django blog tutorial part 1: Project Configuration
- Django blog tutorial part 2: Model View Template
- Django blog tutorial part 3: Authentication and Profile Page
- Django blog tutorial 4: Posts and Comments (This post)
- Django blog tutorial part 5: Deployment on Heroku
- Django blog tutorial part 6: Setting Up an Email Service
- Django blog tutorial part 7: Serving Media Files From Amazon S3
Sponsored

Users' Posts
Now that we have users in the system, we want to offer them a way to create, edit, and delete their posts. To do so, we are going to use the built-in class-based views CreateView, UpdateView, and DeleteView.
In the beginning, it can be difficult to work with generic class-based view but they can save you a lot of time.
Before we begin, check out the ccbv.co.uk website. This can be useful when working with GCBV.
Let's start by adding the following code:
# core/views.py from django.views.generic import ( ListView, DetailView, CreateView, UpdateView, DeleteView ) from django.contrib.auth.mixins import LoginRequiredMixin from django.shortcuts import get_object_or_404 from django.utils.text import slugify from django.urls import reverse_lazy from django.contrib import messages # ... class PostCreateView(LoginRequiredMixin, CreateView): model = Post fields = ["title", "content", "image", "tags"] def get_success_url(self): messages.success( self.request, 'Your post has been created successfully.') return reverse_lazy("core:home") def form_valid(self, form): obj = form.save(commit=False) obj.author = self.request.user obj.slug = slugify(form.cleaned_data['title']) obj.save() return super().form_valid(form) class PostUpdateView(LoginRequiredMixin, UpdateView): model = Post fields = ["title", "content", "image", "tags"] def get_context_data(self, **kwargs): context = super().get_context_data(**kwargs) update = True context['update'] = update return context def get_success_url(self): messages.success( self.request, 'Your post has been updated successfully.') return reverse_lazy("core:home") def get_queryset(self): return self.model.objects.filter(author=self.request.user) class PostDeleteView(LoginRequiredMixin, DeleteView): model = Post def get_success_url(self): messages.success( self.request, 'Your post has been deleted successfully.') return reverse_lazy("core:home") def get_queryset(self): return self.model.objects.filter(author=self.request.user) With these views, users have all the features to deal with the post.
To ensure that only logged in users have access to these views, we used the mixin LoginRequiredMixin.
The get_queryset() method filters the post so that only its owner can access it.
We are using the get_success_url() method to redirect to the home page and at the same time display a message. We could have used the success_url parameter to specify a URL to redirect to.
Now add the following URLs in the urls.py file:
# core/urls.py from django.urls import path from .views import HomeView, PostView, PostCreateView, PostUpdateView, PostDeleteView urlpatterns = [ # ... path('post/create/', PostCreateView.as_view(), name='post_create'), path('post/<int:pk>/', PostUpdateView.as_view(), name='post_update'), path('post/<int:pk>/delete/', PostDeleteView.as_view(), name='post_delete'), ] Sponsored

Template Post
Since we are not specifying template names for these views, we have to follow the pattern <app_name>/<model_name>_<operation_name>.html.
For the PostCreateView, the template name is core/post_form.html:
<!-- templates/core/post_form.html --> {% extends "base.html" %} {% block head_title %}{% if update %}Update post{% else %}Create a post{% endif %}{% endblock head_title %} {% block content %} <div class="container"> <div class="row"> <div class="col-8 offset-2"> <h2 class=" my-5">{% if update %}Update post{% else %}Create a post{% endif %}</h2> <form method="post" enctype="multipart/form-data"> {% csrf_token %} <div class="form-group"> {{ form.title.label_tag }} <input type="text" class="form-control {% if form.title.errors %}is-invalid{% endif %}" id="id_title" name="title" value='{{ form.title.value|default:"" }}'> {% if form.title.errors %} <div class="invalid-feedback">{{ form.title.errors }}</div> {% endif %} </div> <div class="form-group"> {{ form.content.label_tag }} <textarea type="text" class="form-control {% if form.content.errors %}is-invalid{% endif %}" id="id_content" name="content" cols="40" rows="10">{{ form.content.value|default:"" }}</textarea> {% if form.content.errors %} <div class="invalid-feedback">{{ form.content.errors }}</div> {% endif %} </div> <div class="form-group"> {{ form.image.label_tag }}<br> <input type="file" class="{% if form.image.errors %}is-invalid{% endif %}" id="id_image" name="image" accept="image/*"> {% if form.image.errors %} <div class="invalid-feedback">{{ form.image.errors }}</div> {% endif %} </div> <div class="form-group"> {{ form.tags.label_tag }}<br> <select class="custom-select w-25" name="tags" id="id_tags" multiple> {% for name, value in form.tags.field.choices %} <option value="{{ name }}">{{ value }}</option> {% endfor %} </select> {% if form.tags.errors %} <div class="invalid-feedback">{{ form.tags.errors }}</div> {% endif %} </div> <button type="submit" class="btn btn-primary"> {% if update %}Update the post{% else %}Create a post{% endif %} </button> </form> </div> </div> </div> {% endblock content %} The PostUpdateView will also load the template core/post_form.html and the PostDeleteView will load the template core/post_confirm_delete.html. Actually, it loads a confirmation page:
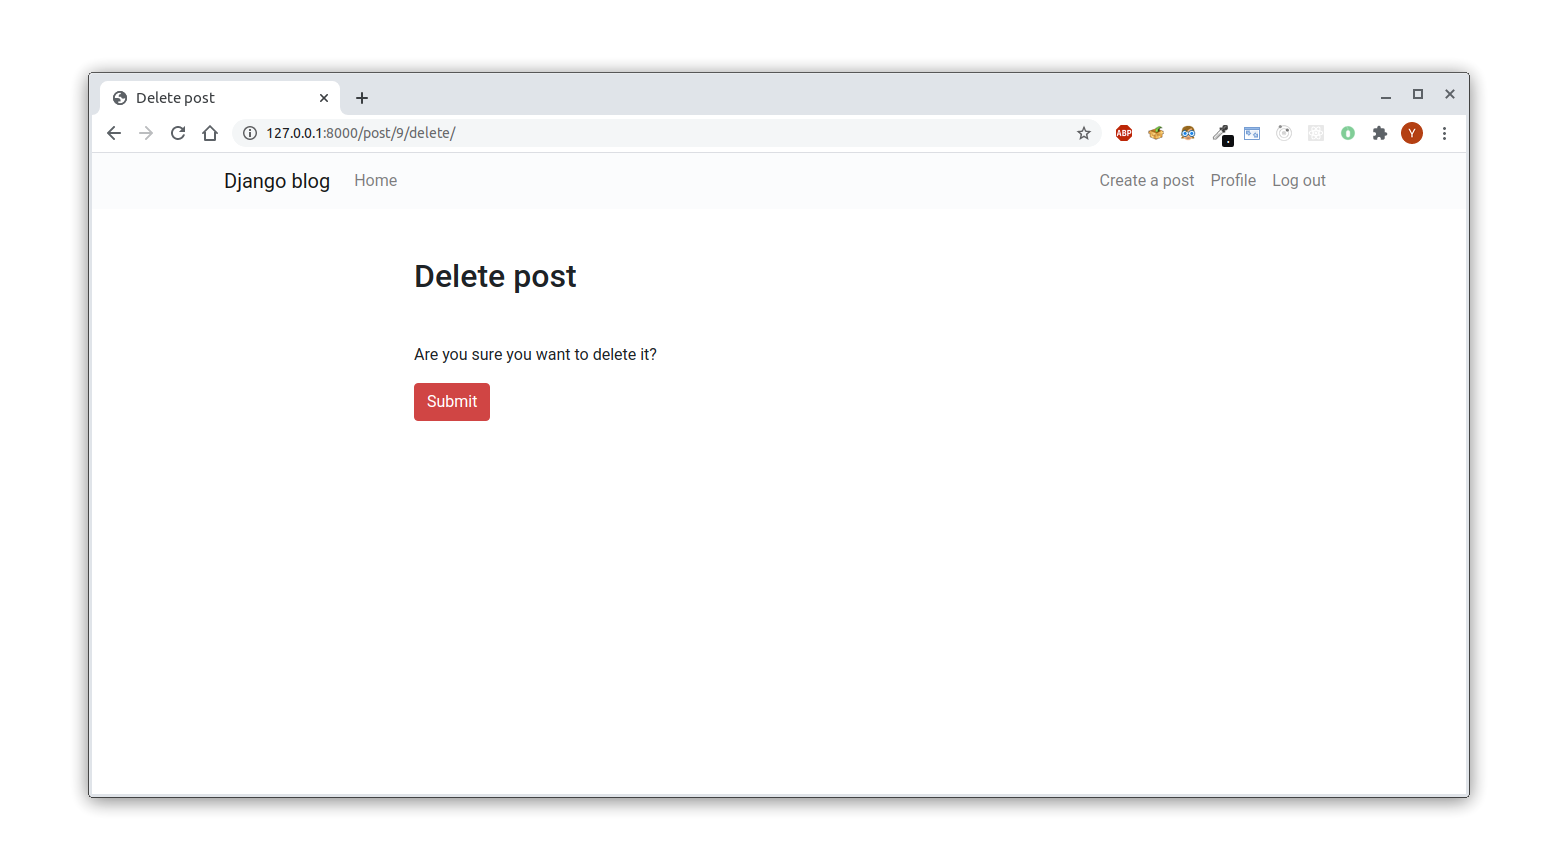
<!-- templates/core/post_confirm_delete.html --> {% extends "base.html" %} {% block head_title %}Delete post{% endblock head_title %} {% block content %} <div class="container"> <div class="row"> <div class="col-8 offset-2"> <h2 class=" my-5">Delete post</h2> <form method="POST"> {% csrf_token %} <p>Are you sure you want to delete it?</p> <button type="submit" class="btn btn-danger">Submit </button> </form> </div> </div> </div> {% endblock content %} To make it easy for users to access these views, let's add some links:
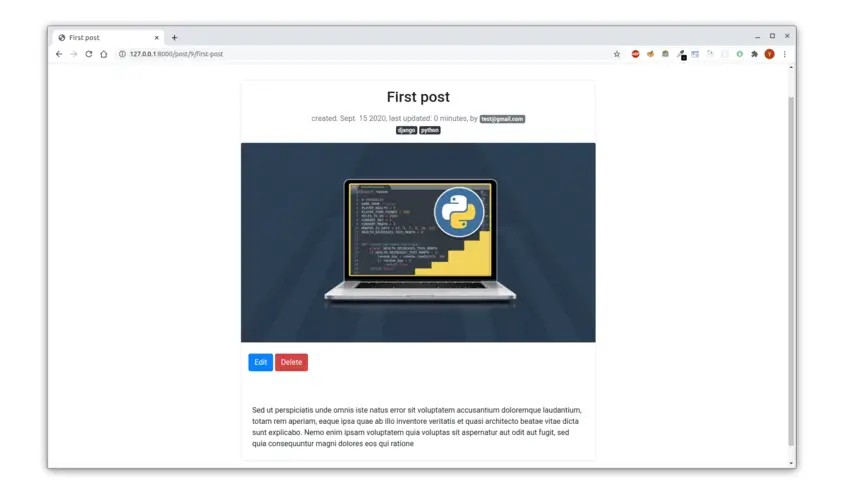
<!-- templates/base.html --> <!-- ... --> {% if request.user.is_authenticated %} <div class="navbar-nav ml-auto"> <a href="{% url 'core:post_create' %}" class="nav-item nav-link {% if request.path == '/post/create/' %}active{% endif %}"> Create a post </a> <!-- ... --> {% endif %} <!-- ... --> <!-- templates/core/post.html --> <!-- ... --> {% if post.image %} <img class="card-img-top" src="{{ post.image.url }}" alt="{{ post.title }}"> {% endif %} {% if post.author == request.user %} <div class="mt-4 mx-3"> <a class="btn btn-primary" href="{% url 'core:post_update' post.id %}">Edit</a> <a class="btn btn-danger" href="{% url 'core:post_delete' post.id %}">Delete</a> </div> {% endif %} <div class="card-text mt-5 p-4"> {{ post.content }} </div> <!-- ... --> 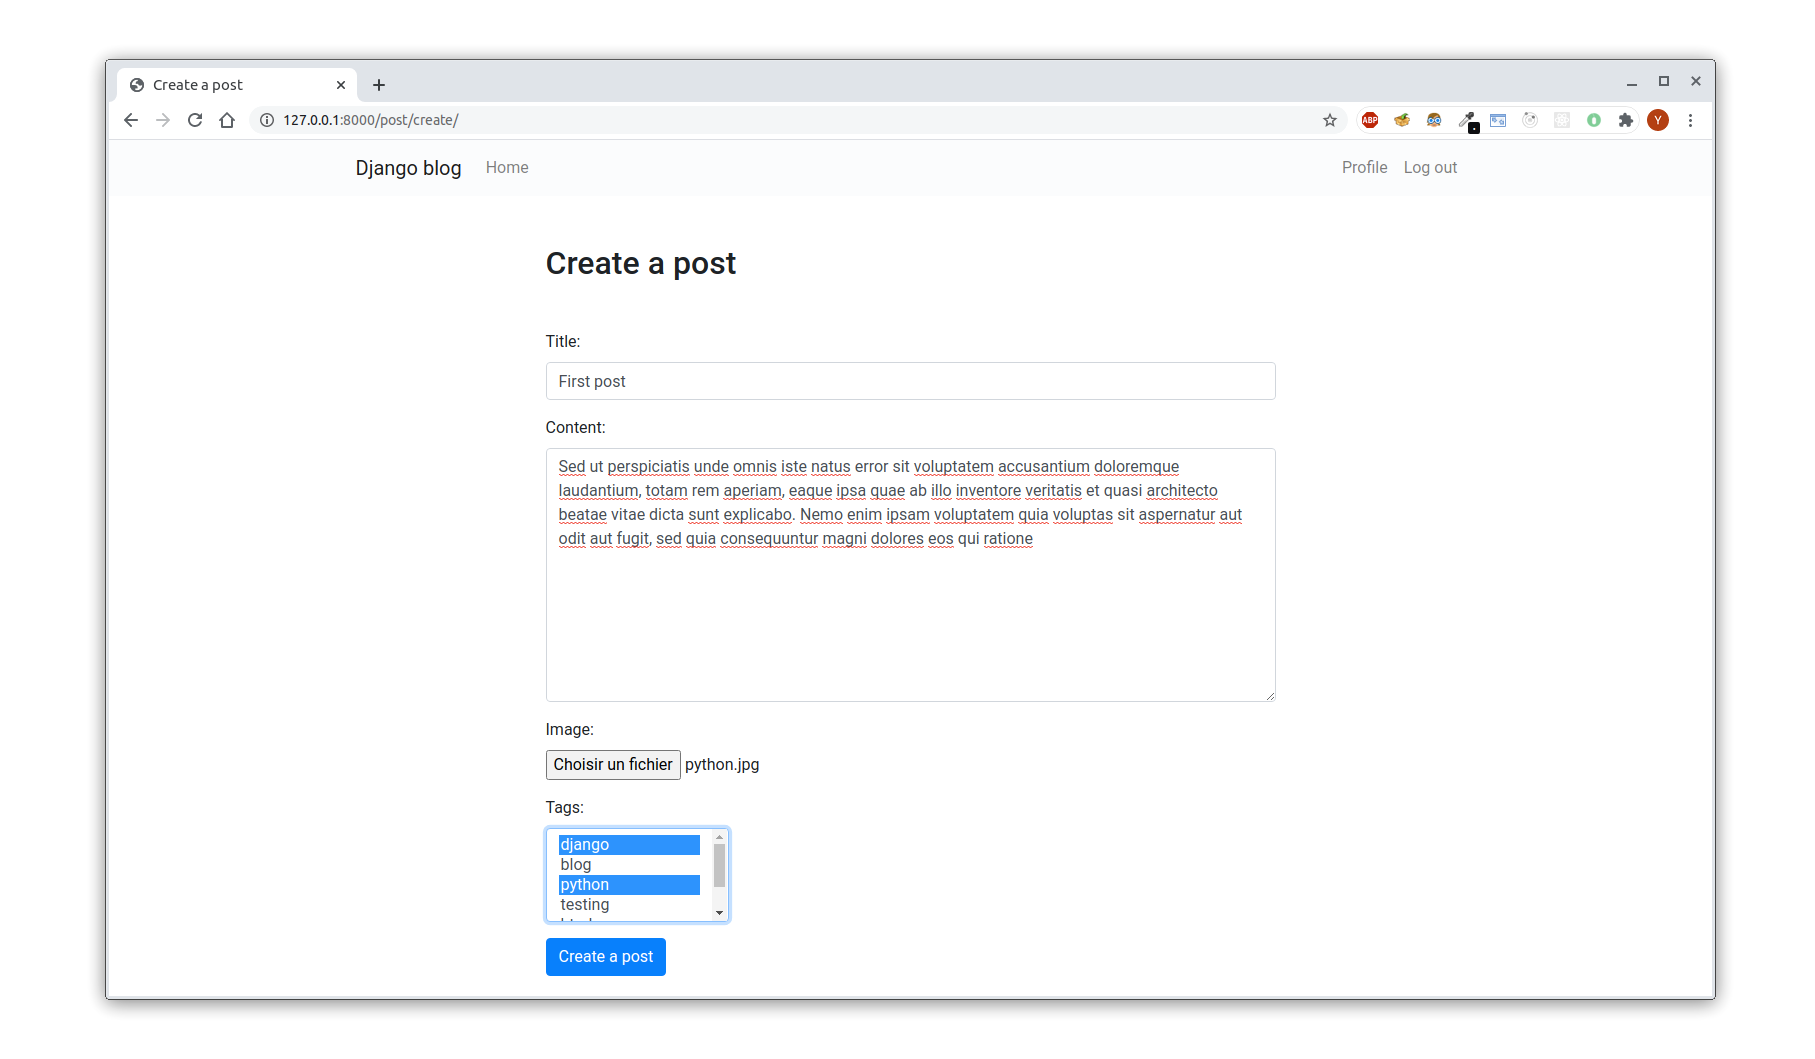
Sponsored

Testing the Post Views
We are going to test that the user cannot update a post of another user and that the post creation is associated with the current user:
# core/test.py from django.urls import reverse from django.test import TestCase from .models import Post from users.models import User class PostCreateViewTest(TestCase): def test_post_create_stores_user(self): user1 = User.objects.create_user( username='user1', email='user1@gmail.com', password='1234' ) post_data = { 'title': 'test post', 'content': 'Hello world', } self.client.force_login(user1) self.client.post(reverse('core:post_create'), post_data) self.assertTrue(Post.objects.filter(author=user1).exists()) class PostUpdateViewTest(TestCase): def test_post_update_returns_404(self): user1 = User.objects.create_user( username='user1', email='user1@gmail.com', password='1234' ) user2 = User.objects.create_user( username='user2', email='user2@gmail.com', password='1234' ) post = Post.objects.create( author=user1, title='test post', content='Hello world') self.client.force_login(user2) response = self.client.post( reverse('core:post_update', kwargs=({'pk': post.id})), {'title': 'change title'} ) self.assertEqual(response.status_code, 404) Let's start with the model:
# core/models.py # ... class Comment(models.Model): name = models.CharField(max_length=50) email = models.EmailField(max_length=100) content = models.TextField() post = models.ForeignKey(Post, on_delete=models.CASCADE) created = models.DateTimeField(auto_now_add=True) class Meta: ordering = ('-created',) def __str__(self): return 'Comment by {}'.format(self.name) Generate the migrations and apply them to the database:
(venv) $ python manage.py makemigrations (venv) $ python manage.py migrate Create a file form.py in the core app:
# core/forms.py from django import forms from .models import Comment class CommentForm(forms.ModelForm): class Meta: model = Comment fields = ('name', 'email', 'content') ModelForm is a special type of form. These are forms that are automatically generated from a model. You can include fields via the fields attribute.
The view
We will extend the PostView to handle the logic of comment:
# core/views.py # ... from .models import Post, Comment from .forms import CommentForm # ... class PostView(DetailView): model = Post template_name = "core/post.html" def get_context_data(self, **kwargs): context = super().get_context_data(**kwargs) pk = self.kwargs["pk"] slug = self.kwargs["slug"] form = CommentForm() post = get_object_or_404(Post, pk=pk, slug=slug) comments = post.comment_set.all() context['post'] = post context['comments'] = comments context['form'] = form return context def post(self, request, *args, **kwargs): form = CommentForm(request.POST) self.object = self.get_object() context = super().get_context_data(**kwargs) post = Post.objects.filter(id=self.kwargs['pk'])[0] comments = post.comment_set.all() context['post'] = post context['comments'] = comments context['form'] = form if form.is_valid(): name = form.cleaned_data['name'] email = form.cleaned_data['email'] content = form.cleaned_data['content'] comment = Comment.objects.create( name=name, email=email, content=content, post=post ) form = CommentForm() context['form'] = form return self.render_to_response(context=context) return self.render_to_response(context=context) Basically, what we've done is that when a post request is made, we get all the comments for the current post. And if the form is valid, we save the new comment and assign it to the current post, otherwise, we initialize the form with the post data and send it to the template. Note that even when the form is valid, we instantiate an object form and send it to the template, because the post request returns to the same page
Sponsored

Let's edit the post page to include all comments for a post as well as a form to leave a comment:
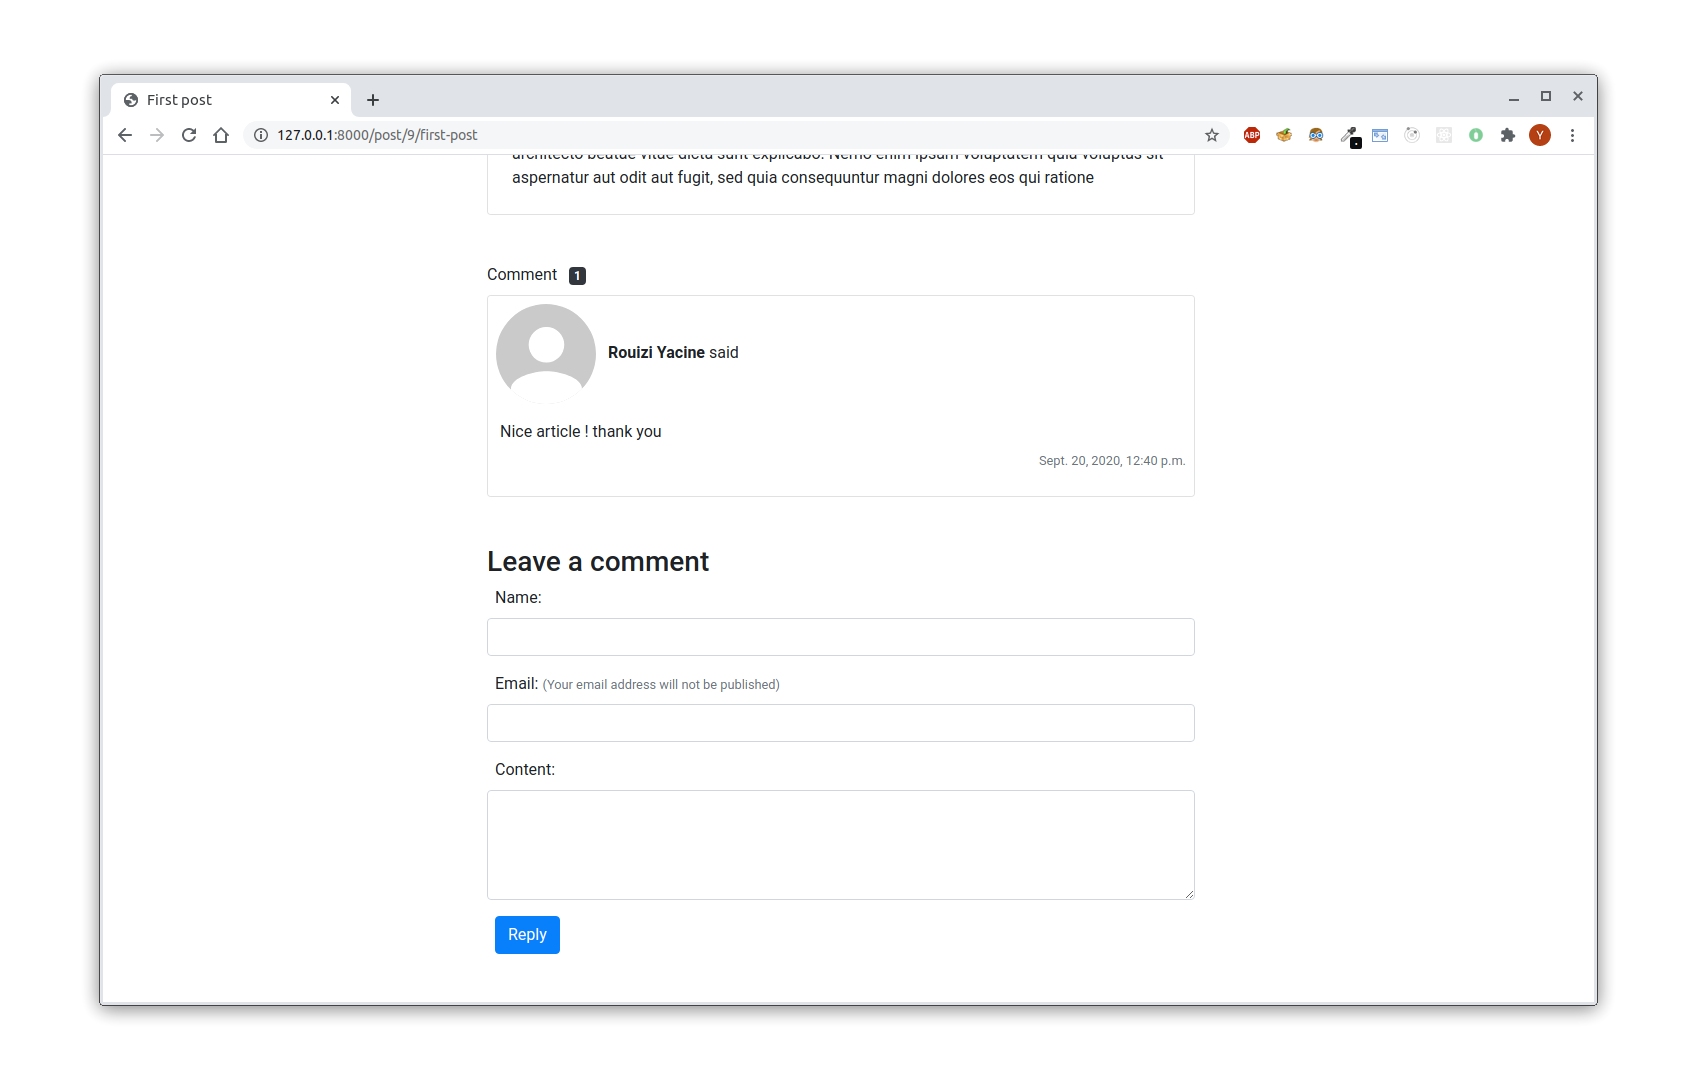
<!-- templates/core/post.html --> {% extends 'base.html' %} {% load static %} <!-- add this line --> {% block head_title %}{{ post.title }}{% endblock %} {% block content %} <div class="container-fluid my-5"> <!-- ... --> <!-- List of comments --> {% if comments %} <div class="row mt-5"> <div class="col-lg-6 offset-lg-3"> Comment{{ comments.count|pluralize }} <span class="badge badge-dark ml-2">{{ comments.count }}</span> </div> {% for comment in comments %} <div class="col-lg-6 offset-lg-3 mt-2"> <div class="card p-2"> <div class="row"> <div class="col-12"> <img class="rounded-circle mr-2" src="{% static 'img/avatar.svg' %}" alt="Avatar"> <strong>{{ comment.name }}</strong> said </div> <div class="col-12"> <p class="m-1 mt-3">{{ comment.content }}</p> <p class="text-right text-muted"><small>{{ comment.created }}</small></p> </div> </div> </div> </div> {% endfor %} </div> {% endif %} <!-- Form to leave comment --> <div class="row mt-5"> <div class="col-lg-6 offset-lg-3"> <h3>Leave a comment</h3> <form method='POST'> {% csrf_token %} <div class="form-group"> <span class="ml-2"></span>{{ form.name.label_tag }} <input type="text" class="form-control {% if form.name.errors %}is-invalid{% endif %}" id="id_name" name="name" value="{{ form.name.value|default:'' }}"> </div> <div class="form-group"> <span class="ml-2"></span> {{ form.email.label_tag }} <span class="text-muted"><small>(Your email address will not be published)</small></span> <input type="text" class="form-control {% if form.email.errors %}is-invalid{% endif %}" id="id_email" name="email" value="{{ form.email.value|default:'' }}"> </div> <div class="form-group"> <span class="ml-2"></span>{{ form.content.label_tag }} <textarea class="form-control {% if form.content.errors %}is-invalid{% endif %}" id="id_content" name="content" rows="4">{{ form.content.value|default:'' }}</textarea> </div> <button class="btn btn-primary ml-2" type="submit">Reply</button> </form> </div> </div> </div> {% endblock content %} The template itself is quite simple. The two things to note are that we are using comments.count, this is equivalent to comments.count() in views. This displays the number of comments.
We are also using the template filter pluralize, this adds the suffix 's' to the word comment if the number of comments is above 1.
Now let's run the server and see the end result:
This completes our fourth tutorial. We can improve the comment feature a little bit. For example, if a user is logged in, we can fill out the comment form with his username and email address. We can also allow visiting a user's profile from his comment. You can do that as an exercise, it's not that hard.
You can find the source code of the project, including this chapter, at this link: https://github.com/Rouizi/django-blog/tree/v0.4
If you want to say something please leave a comment below. See you in the next part.
How To List Comments In A Blog Chronological Order Django
Source: https://dontrepeatyourself.org/post/django-blog-tutorial-part-4-posts-and-comments/
Posted by: maciassonififf.blogspot.com
0 Response to "How To List Comments In A Blog Chronological Order Django"
Post a Comment